Hi all,
For the last month I was a bit busy so couldn't post much in the blog. However I think its time to share some links. I am trying to group them so that they can be easy to maintain.
Documentation and Reference
1. MSDN Documentation
2. Silverligh Controls
3. Pattern and Practices
4. Silverlight 2 developer poster
5. Silverlight Deployment Guide.
Tips
1. Silverlight Tips
Extra Controls
1. http://www.codeplex.com/silverlightcontrib
2. http://www.codeplex.com/Silverlight
4. http://www.telerik.com/products/silverlight.aspx
5. http://www.componentone.com/SuperProducts/StudioSilverlight/
Some good sites and applications build in Silverlight
1. Hard rock memorabilia
2. A huge collection of Silverlight applications
Some good blogs
1. Tim Heuer's blog
2. Jesse Liberty's blog
3. Michael Sync's blog
4. Pete Brown's blog
5. Avi Pilosof's blog
6. Wilfred Pinto's blog
7. Shine draw
8. Scottgu's blog
9. Makram's Silverlight blog
10. MossyBlog
11. Shawn Wildermuth's blog
3D with Silverlight
1. http://www.codeplex.com/kit3d
Community Sites
1. Official Silverlight Community Site
2. Silverlight Show
I will try keep this updated. Also please add comments if you have some other good links and I will add them.
Tuesday, December 9, 2008
Tuesday, November 4, 2008
Silverlight Flexible Layout
Hi friends,
I have seen in Silverlight forums and other places that there are some confusions about Layouts. Specially how to give your Silverlight application a flexible layout that will be adjusted automatically as browser resize. Hope this post helps.
Basically there are two ways of doing it. One is from code where you will change the height,widths of controls as browser resizes. Another is creating layout as it automatically changes with browser resize. I will explain the later here.
Silverlight has 3 layout controls. Grid, StackPanel and Canvas. Canvas is NOT A FLEXIBLE ONE. Other two are. That does not mean you will not use Canvas but you will use it where you know the canvas does not have to be adjusted with browser resize.
So basically we will try building the following layout.

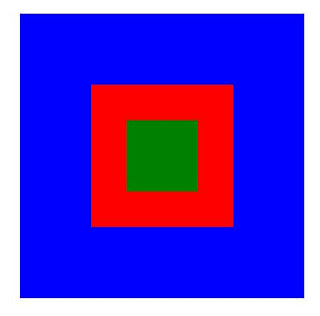
Now the top part is flexible provided that the text will come in middle. Middle green part is flexible but has a orange box in it that is fixed size. Bottom left red part is fixed but right skyblue part is flexible with text aligned to right.
Now come to the Page.xaml. There will be one LayoutRoot Grid is already defined. Now as you can see we will have 3 rows in the LayoutRoot Grid. Top white one middle one and bottom one.
We will set fixed height for top and bottom rows and let the middle row occupy the remaining height. I have given 100px for Top one and 100px for bottom one.
We will put one Grid for each row namely TopGrid, MiddleGrid and BottomGrid and set their Grid.Row property to 0,1 and 2 respectively.
Now we will define two columns for the BottomGrid. First one with fixed width ( 70 here) and the second one with remaining size. We will also add two Grids inside bottom grid and set Grid.Column to 0 and 1 respectively. We will name them as LeftBottomGrid and RightBottomGrid.
Now if you set the Grid backgrounds as the above image your application will look something like the following in the design view.

My Usercontrol width and height are 40o and 500 respectively.
Now we will add one textblock in the TopGrid and with text "WELCOME TO SILVERLIGHT" and set text align to center. Also set its vertical align ment to center.
We will add one canvas with orange background inside MiddleGrid and set its height and width to 100.
We will finally add another textblock in the RightBottomGrid with text "Code name Mrgni" and have its text alignment right. Also set its vertical alignment to center.
Now remove the height and width from the UserControl tag. It is required as we want our Silverlight application to Streach the entire div it has been assign to. Now run the application and here it goes....
Now here we have not used any relative positioning. But that can be done easily. Suppose you want the TopGrid to always have the height 100 but want the BottomGrid to have 1/5 th of remaining height and rest part to be occupied to MiddleGrid. Just change LayoutGrid's rowdefinitions as 100, 4*, 1* and you are done.
Here is the complete source for it. Please leave a comment if you have any doubt or any correction. I have done this application totally from Visual Studio but you can do it from blend as well.
I have seen in Silverlight forums and other places that there are some confusions about Layouts. Specially how to give your Silverlight application a flexible layout that will be adjusted automatically as browser resize. Hope this post helps.
Basically there are two ways of doing it. One is from code where you will change the height,widths of controls as browser resizes. Another is creating layout as it automatically changes with browser resize. I will explain the later here.
Silverlight has 3 layout controls. Grid, StackPanel and Canvas. Canvas is NOT A FLEXIBLE ONE. Other two are. That does not mean you will not use Canvas but you will use it where you know the canvas does not have to be adjusted with browser resize.
So basically we will try building the following layout.

Now the top part is flexible provided that the text will come in middle. Middle green part is flexible but has a orange box in it that is fixed size. Bottom left red part is fixed but right skyblue part is flexible with text aligned to right.
Now come to the Page.xaml. There will be one LayoutRoot Grid is already defined. Now as you can see we will have 3 rows in the LayoutRoot Grid. Top white one middle one and bottom one.
We will set fixed height for top and bottom rows and let the middle row occupy the remaining height. I have given 100px for Top one and 100px for bottom one.
We will put one Grid for each row namely TopGrid, MiddleGrid and BottomGrid and set their Grid.Row property to 0,1 and 2 respectively.
Now we will define two columns for the BottomGrid. First one with fixed width ( 70 here) and the second one with remaining size. We will also add two Grids inside bottom grid and set Grid.Column to 0 and 1 respectively. We will name them as LeftBottomGrid and RightBottomGrid.
Now if you set the Grid backgrounds as the above image your application will look something like the following in the design view.

My Usercontrol width and height are 40o and 500 respectively.
Now we will add one textblock in the TopGrid and with text "WELCOME TO SILVERLIGHT" and set text align to center. Also set its vertical align ment to center.
We will add one canvas with orange background inside MiddleGrid and set its height and width to 100.
We will finally add another textblock in the RightBottomGrid with text "Code name Mrgni" and have its text alignment right. Also set its vertical alignment to center.
Now remove the height and width from the UserControl tag. It is required as we want our Silverlight application to Streach the entire div it has been assign to. Now run the application and here it goes....
Now here we have not used any relative positioning. But that can be done easily. Suppose you want the TopGrid to always have the height 100 but want the BottomGrid to have 1/5 th of remaining height and rest part to be occupied to MiddleGrid. Just change LayoutGrid's rowdefinitions as 100, 4*, 1* and you are done.
Here is the complete source for it. Please leave a comment if you have any doubt or any correction. I have done this application totally from Visual Studio but you can do it from blend as well.
Friday, October 31, 2008
Too Early For Silverlight 3?
Hi friends,
I am excited about what Silverlight 2 brings us. Still there are some features that we miss and might come in the next release. I have created a thread for Silverlight 3 Wish List in the Silverlight forums. Please add whatever you think might come in handy in next release. And yes Silverlight Team do care about the community.
I am excited about what Silverlight 2 brings us. Still there are some features that we miss and might come in the next release. I have created a thread for Silverlight 3 Wish List in the Silverlight forums. Please add whatever you think might come in handy in next release. And yes Silverlight Team do care about the community.
Sunday, October 19, 2008
A Simple Clock In Silverlight
Hi friends,
Friday one of my friends (Manasa) send me some unusual clocks developed in flash. That gave me the idea of making one of them (the easiest one) in Silverlight.
I made it like the following
The root canvas contains 7 canvases. Each of them holds seconds, minutes, hours and other texts and digits. Each of the canvas is wide enough to hold all the digits or text. The root canvas clips it to show only 450 pixel. The child canvases move right to left so it appears moving to the user.
Now lets see seconds panel. Others will be similar.
Seconds panel has 9 digits visible at any time. Total seconds panel contains all the digits and clipped by the root to show only 9 digits.
Seconds panel has got 69 digits 0 1 2 3.......58 59 0 1 2 3 4 5 6 7 8. Last 9 digits are added because when we shift the panel from right to left at time the viewable part will be 59 0 1 2 3 4 5 6 7 8.(half of 59 and half of 8) Then it will be again 0 1 2 3 4 5 6 7 8 and this time we can repeat the animation without letting user see any discontinuity.
Seconds, minutes and hours panels are been shifted through animations. Days, dates are updated once in an hour. Months are updated once in a day and years are once in a month. (Seeing it update will keep you open your browser at least a month though !!!)
When the application starts it updates so the red line shows current values.
You can find the complete code here.
Friday one of my friends (Manasa) send me some unusual clocks developed in flash. That gave me the idea of making one of them (the easiest one) in Silverlight.
I made it like the following
Brief Explanation
The root canvas contains 7 canvases. Each of them holds seconds, minutes, hours and other texts and digits. Each of the canvas is wide enough to hold all the digits or text. The root canvas clips it to show only 450 pixel. The child canvases move right to left so it appears moving to the user.
Now lets see seconds panel. Others will be similar.
Seconds panel has 9 digits visible at any time. Total seconds panel contains all the digits and clipped by the root to show only 9 digits.
Seconds panel has got 69 digits 0 1 2 3.......58 59 0 1 2 3 4 5 6 7 8. Last 9 digits are added because when we shift the panel from right to left at time the viewable part will be 59 0 1 2 3 4 5 6 7 8.(half of 59 and half of 8) Then it will be again 0 1 2 3 4 5 6 7 8 and this time we can repeat the animation without letting user see any discontinuity.
Seconds, minutes and hours panels are been shifted through animations. Days, dates are updated once in an hour. Months are updated once in a day and years are once in a month. (Seeing it update will keep you open your browser at least a month though !!!)
When the application starts it updates so the red line shows current values.
You can find the complete code here.
Thursday, October 16, 2008
Fractal Images -- Mathematics With Silverlight Again
Hi all,
When I first seen fractal images I was really impressed and wanted a bit try for making one myself. I have made a simple application that will generate some kool images based on fractal algorithms. This program is not for describing fractals, this is just to make some pretty images totally by complex mathematics.
here is one image that uses (Z * Z * Z + C) / (Z * Z * Z - C) formula and C=0.45 here. (C and Z are complex numbers)

You can make lots of images using different equation and different values of C.
How the Images are created.....
The image is actually a collection of 1 x 1 pixel ellipse different color. These ellipses are placed in a 500 x 600 Canvas. fractal algorithm determines how to color the ellipses and that is the only magic.
Algorithm.....
int iteration = 0;
do
{
R = (Z * Z * Z + C) / (Z * Z * Z - C);
Z = R;
iteration++;
} while (iteration < 100 && (R.Real * R.Real + R.Imaginary * R.Imaginary) < 4);
For coloring the ellipse
Random r = new Random(iteration);
byte red = (byte)r.Next(255);
byte green = (byte)r.Next(255);
byte blue = (byte)r.Next(255);
Plot(x, y, Color.FromArgb(255, red, green, blue));
Though it is using random number for same iteration value the color will be same as iteration is been used as seed for the random number. This is the beauty of pseudo numbers.
Here you can download the complete source code.
You can see the application running here.
One caution:- The code involve too many computation and placing 300000 ellipses. So it takes about 20 seconds to complete and might hang your browser during this time.
Here and here you can see details about fractals and algorithms.
I have updated some of my applications and posts in last few days. I will complete it as soon as I can.
Wednesday, October 15, 2008
SL 2 And All My Broken Applications
Silverlight 2 is released. Now it has some breaking changes that breaks all of beta 2 applications. Though Microsoft has given some time to update beta 2 application to RC0 so they will be compatible to final release I did not get time to update my applications that I will be doing when I get time. I will be making some other applications as well. I will have to update my posts so they are still relevant. Lots of changes....
Tuesday, September 30, 2008
Silverlight RC0...After A Long Wait
[ Silverlight 2 is now released so this post is no longer valid. ]
Silverlight RC0 has been shipped. It is only developers release but will be feature complete. I did not get much time to see if it breaks some of my applications. It does have some features we were waiting for but we expected some more. Anyway lets see how it works with the new expression blend service pack and VS tools.
Installing RC0 might be a bit painful as it needs uninstalling all previous SL things and needs some tools. Here is the steps I did to get it work.
1. Uninstalled everything related to beta 2. (Silverlight tools for VS, Expression Blend, Plugin -- Everything)
2. Installed Silverlight 2 RC0 developer runtime.
2. Installed Microsoft Visual Studio 2008 Service Pack 1.
3. Installed new Silverlight tools for VS 2008.
4. Expression Blend 2 trial version.
5. Blend 2 SP1.
Oops. Finally. :)
Steps might be different but I got it working this way.
One important thing is this is only developers release so publicly only beta 2 is available now. So we can't yet release the application in RC0 but lets prepare for the day. :)
Monday, September 22, 2008
Starting Silverlight
[ Links for the tools are updated for Silverlight 2. Some of the sites listed below may not been updated yet and contain beta 2 applications and links. ]
Hi all,
My blog has survived a few months and I was posting on somewhat random articles and applications. Some of my friends have started learning Silverlight and asked me to share some links and samples. Here is my list.
Install Silverlight 2 runtime from here.
Essential for all....
Expression Blend 2
Expression Blend 2 SP 1
Deep Zoom Composer (Used for a feature called DeepZoom in Silverlight)
Silverlight 2 Documentation
If you are interested in design....
Expression Design 2 Trial.
Expression Encoder Trial.
If You are interested in programming....
1. If you don't know C#, start learning basics of it. The basic would be sufficient for building simple Silverlight applications.
2. If you have C# background, probably you have worked with Visual Studio. If not, install it and play a little time with it. Silverlight 2 needs Visual Studio 2008 and you can get a trial version from here. You also need to install SP1 for VS 2008.
3. Install Silverlight Tools For Visual Studio 2008. (It also installs Silverlight plug-in for the browsers if it is not there).
Optional but will help you....
Get an live account and you can get 10 GB of hosting space free for the Silverlight applications you build. Get it here.
Silverlight.net has a great collection of tutorials and videos. You can start from the quick start tutorials.
Using Expression Blend
QuickStart (Mainly for the programmers but designers might see it to get an idea)
You can also start by watching the videos.
Try building something as soon as you feel you can create a simple application.
I am a Flash Developer. Where from I start?
1. You need the basic tools described in the first section.
2. Here is a link that will help you use your existing skills to building Silverlight application.
I know the basics and wanna dig into deeper.
There are some videos and tutorials focused on some advanced topics in Silverlight.net.
You will get a complete set of resources here.
Hey. Let me see some cool samples before I start.
You can find big list of excellent applications created in Silverlight here and here.
PS: Actually you can find almost everything in the Silverlight Community Site. It has a great forum that helps in every type of problems you face working with Silverlight.
Hi all,
My blog has survived a few months and I was posting on somewhat random articles and applications. Some of my friends have started learning Silverlight and asked me to share some links and samples. Here is my list.
Tools
Basic thing you need....Install Silverlight 2 runtime from here.
Essential for all....
Expression Blend 2
Expression Blend 2 SP 1
Deep Zoom Composer (Used for a feature called DeepZoom in Silverlight)
Silverlight 2 Documentation
If you are interested in design....
Expression Design 2 Trial.
Expression Encoder Trial.
If You are interested in programming....
1. If you don't know C#, start learning basics of it. The basic would be sufficient for building simple Silverlight applications.
2. If you have C# background, probably you have worked with Visual Studio. If not, install it and play a little time with it. Silverlight 2 needs Visual Studio 2008 and you can get a trial version from here. You also need to install SP1 for VS 2008.
3. Install Silverlight Tools For Visual Studio 2008. (It also installs Silverlight plug-in for the browsers if it is not there).
Optional but will help you....
Get an live account and you can get 10 GB of hosting space free for the Silverlight applications you build. Get it here.
Learning materials
I am completely new. Where from I start?Silverlight.net has a great collection of tutorials and videos. You can start from the quick start tutorials.
Using Expression Blend
QuickStart (Mainly for the programmers but designers might see it to get an idea)
You can also start by watching the videos.
Try building something as soon as you feel you can create a simple application.
I am a Flash Developer. Where from I start?
1. You need the basic tools described in the first section.
2. Here is a link that will help you use your existing skills to building Silverlight application.
I know the basics and wanna dig into deeper.
There are some videos and tutorials focused on some advanced topics in Silverlight.net.
You will get a complete set of resources here.
Hey. Let me see some cool samples before I start.
You can find big list of excellent applications created in Silverlight here and here.
PS: Actually you can find almost everything in the Silverlight Community Site. It has a great forum that helps in every type of problems you face working with Silverlight.
Some Other Links
Actually nothing new here. But I think this blog would be incomplete if I don't stack some useful links up.
You can get a detail listing of tools and materials here.
Overview
Wikipedia link. :) Don't you think it is a must?
An Excellent Video Tutorial.
Another Big List.
Overview
Wikipedia link. :) Don't you think it is a must?
An Excellent Video Tutorial.
Another Big List.
Thursday, September 18, 2008
Let's Not Stop Here
[ Updated for Silverlight 2 ]
Hi friends,
In my previous post I have listed 10 lesser known things in Silverlight. Here are some more.....
1. Scale Mode: See the following code.
<div style="height:5;width:500;border:solid 3px #00FF00;"">
<asp:Silverlight ScaleMode="None" Width="100%" Height="100%" ...... />
</div>
Now see the blue part. There are 3 values you can set in ScaleMode. None (that is default), Stretch and Zoom.
None: The Silverlight component retains its size specified inside. (in Page.xaml for example)
Stretch: The Silverlight component occupies the available space inside the div.
Zoom: Like Stretch but keeps the aspect ratio.

2. Check Silverlight Version: You can check what silverlight version is installed in your computer in this page.
3. Silverlight Event Bubbling: Silverlight has some events that are called routed events and they bubble from child to its parent element. Mainly mouse and keyboard events fall in this category.
This simple application will show how Silverlight event bubbling works and what you can do to allow or stop it.
Lets have 3 canvases and arranged them like the following
Blue Part is the root canvas, red one is a child inside blue one and green one is inside red canvas.
RootCanvas -> Blue one
Child1Canvas -> Red one
Child2Canvas -> Green one
Now we will write 3 MouseLeftButtonDown event handlers for 3 of them.
public Page()
{
InitializeComponent();
Loaded += new RoutedEventHandler(Page_Loaded);
}
void Page_Loaded(object sender, RoutedEventArgs e)
{
RootCanvas.MouseLeftButtonDown += new MouseButtonEventHandler(RootCanvas_MouseLeftButtonDown);
Child1Canvas.MouseLeftButtonDown += new
MouseButtonEventHandler(Child1Canvas_MouseLeftButtonDown);
Child2Canvas.MouseLeftButtonDown += new
MouseButtonEventHandler(Child2Canvas_MouseLeftButtonDown);
}
void Child2Canvas_MouseLeftButtonDown(object sender, MouseButtonEventArgs e)
{
}
void Child1Canvas_MouseLeftButtonDown(object sender, MouseButtonEventArgs e)
{
}
void RootCanvas_MouseLeftButtonDown(object sender, MouseButtonEventArgs e)
{
}
Now set breakpoints on each of the event handlers to see what is going on. You can also put alert for it. Now run the application and click on the green canvas. You will see the break points are hit in the order green canvas (child 2) to its parent red canvas to its parent the blue canvas.
Now this is the default behavior. Now suppose we want to pass the event from green to its parent red but not to the blue one. Now as at the red canvas we want to stop the bubbling we have to write
e.Handled=true at its event handler. Now the event will not be passed to the blue one.
void Child1Canvas_MouseLeftButtonDown(object sender, MouseButtonEventArgs e)
{
e.Handled = true;
}
Now Silverlight controls handles the mouse events internally and they don't let them bubble. So if you place a button or other Silverlight control inside the green canvas you will not be able to catch its mouse down event or pass it to the parent canvas.
See this great blog post and this documentation for details.
4. Enable help for Silverlight in Visual Studio 2008: You already installed Silverlight SDK and still can't see help on Silverlight from Visual Studio? Here is how to enable it.
1. Open Visual Studio (you might have to open VS as an administrator).
2. In the Help menu, choose Index. Microsoft Document Explorer displays.
3. In the Filtered by: drop-down, choose to (unfiltered).
4. In the Look for field, type Collection Manager.
5. Below the Collection Manager heading, double click Help.
6. Below the Collections available for inclusion in VSCC heading, check Microsoft Silverlight 2
SDK Documentation.
7. Click Update VSCC.
Now after restarting visual studio you can see it in help -> contents.
This steps you can find inside the readme file
C:\Program Files\Microsoft SDKs\Silverlight\v2.0\Documentation\VS-Help\en-us\readme.txt
Hi friends,
In my previous post I have listed 10 lesser known things in Silverlight. Here are some more.....
1. Scale Mode: See the following code.
<div style="height:5;width:500;border:solid 3px #00FF00;"">
<asp:Silverlight ScaleMode="None" Width="100%" Height="100%" ...... />
</div>
Now see the blue part. There are 3 values you can set in ScaleMode. None (that is default), Stretch and Zoom.
None: The Silverlight component retains its size specified inside. (in Page.xaml for example)
Stretch: The Silverlight component occupies the available space inside the div.
Zoom: Like Stretch but keeps the aspect ratio.
Now we have one Silverlight application. In the Page.xaml we have set the height and width of the user control to 100 and 400. We have one grid that occupies this usercontrol and has a red background.
Now in the html we have set silverlight contenainer div size to be 500 x 500. If we now set ScaleMode="None" That is default we will see our application rendered like the following.

The green border is the border of the silverlight container div. Red part is our original silverlight component.
Following is in Stretch mode
This is in Zoom mode
See how it preserves its aspect ratio in Zoom mode.
Following is in Stretch mode

This is in Zoom mode

See how it preserves its aspect ratio in Zoom mode.
2. Check Silverlight Version: You can check what silverlight version is installed in your computer in this page.
3. Silverlight Event Bubbling: Silverlight has some events that are called routed events and they bubble from child to its parent element. Mainly mouse and keyboard events fall in this category.
This simple application will show how Silverlight event bubbling works and what you can do to allow or stop it.
Lets have 3 canvases and arranged them like the following

Blue Part is the root canvas, red one is a child inside blue one and green one is inside red canvas.
RootCanvas -> Blue one
Child1Canvas -> Red one
Child2Canvas -> Green one
Now we will write 3 MouseLeftButtonDown event handlers for 3 of them.
public Page()
{
InitializeComponent();
Loaded += new RoutedEventHandler(Page_Loaded);
}
void Page_Loaded(object sender, RoutedEventArgs e)
{
RootCanvas.MouseLeftButtonDown += new MouseButtonEventHandler(RootCanvas_MouseLeftButtonDown);
Child1Canvas.MouseLeftButtonDown += new
MouseButtonEventHandler(Child1Canvas_MouseLeftButtonDown);
Child2Canvas.MouseLeftButtonDown += new
MouseButtonEventHandler(Child2Canvas_MouseLeftButtonDown);
}
void Child2Canvas_MouseLeftButtonDown(object sender, MouseButtonEventArgs e)
{
}
void Child1Canvas_MouseLeftButtonDown(object sender, MouseButtonEventArgs e)
{
}
void RootCanvas_MouseLeftButtonDown(object sender, MouseButtonEventArgs e)
{
}
Now set breakpoints on each of the event handlers to see what is going on. You can also put alert for it. Now run the application and click on the green canvas. You will see the break points are hit in the order green canvas (child 2) to its parent red canvas to its parent the blue canvas.
Now this is the default behavior. Now suppose we want to pass the event from green to its parent red but not to the blue one. Now as at the red canvas we want to stop the bubbling we have to write
e.Handled=true at its event handler. Now the event will not be passed to the blue one.
void Child1Canvas_MouseLeftButtonDown(object sender, MouseButtonEventArgs e)
{
e.Handled = true;
}
Now Silverlight controls handles the mouse events internally and they don't let them bubble. So if you place a button or other Silverlight control inside the green canvas you will not be able to catch its mouse down event or pass it to the parent canvas.
See this great blog post and this documentation for details.
4. Enable help for Silverlight in Visual Studio 2008: You already installed Silverlight SDK and still can't see help on Silverlight from Visual Studio? Here is how to enable it.
1. Open Visual Studio (you might have to open VS as an administrator).
2. In the Help menu, choose Index. Microsoft Document Explorer displays.
3. In the Filtered by: drop-down, choose to (unfiltered).
4. In the Look for field, type Collection Manager.
5. Below the Collection Manager heading, double click Help.
6. Below the Collections available for inclusion in VSCC heading, check Microsoft Silverlight 2
SDK Documentation.
7. Click Update VSCC.
Now after restarting visual studio you can see it in help -> contents.
This steps you can find inside the readme file
C:\Program Files\Microsoft SDKs\Silverlight\v2.0\Documentation\VS-Help\en-us\readme.txt
5. Document outline: This is actually a feature in visual studio. If you layout is complex and you want to easily navigate to parent or child elements you can use this. View -> Other winndows -> Document outline.
6. Why my mouse events aint working? Have one simple Silverlight application with a green Grid with height and width 300 and 400. At the MouseLeftButtonDown event handler write one alert.
private void LayoutRoot_MouseLeftButtonDown(object sender, MouseButtonEventArgs e)
{
HtmlPage.Window.Alert("Event is Fired and catched");
}
Now run the application and click the Grid. The alert will come. Now remove the background attribute from the grid and run the application. Click the grid. No alert will come. :). Though I don't know the reason for it but it might be intentional. Guess why? It might prevent bad guys to fool user think clicking an html element.
Thanks all for keep on visiting my blog. I am a bit busy with my work right now and I will post some material for the newbies in Silverlight in my future posts.
Thursday, September 11, 2008
A Simple Wave Generator In Silverlight
[ Updated for Silverlight 2 ]
Hi,
I was building a simple waveform generator that will generate waveform for an equation containing sin, cos and tan. It will choose random color when drawing the curve and can draw one curve over another. The application in run looks like the following.

I cannot put it here as it wont fit in this width. See it here.
What is going inside......
The curve is actually a collection of ellipses of height and width 5. You can see it better if you draw a curve like tan() x sin().
I am trying to explain it from a top level (less detail) it step by step
1. We will have a stack named EqunList that will put the equation in string elements. For example it will store " sin" if you click sin button and then if you click + it will push "+" in the stack above sin.
2. Now when we click draw button the equation list will be converted from infix to postfix notation so that it eliminates the brackets and let us calculate the values of the equation easily.
3. It then chooses a random color for drawing the curve. Then it starts a timer that will put one ellipse every 15 milliseconds so that it seems the curve is been drawn slowly. We will talk about setting x and y coordinates (Canvas.Left and Canvas.Top respectively) of the ellipses shortly.
4. There will be a counter that will be incremented and after reaching a certain value (width of the drawing plane in pixels) will stop the timer.
5. Now the x value of the ellipse (Canvas.Left) will be incremented by 1 in each timer tick (It can be made higher but then the curve might not look very good). The Y value of the ellipse will be determined by evaluating the equation for an angle that will vary from 0 to 2*PI. Here the angle will be increased by 2 * Math.PI / 200 each time. ( It will actually creates a complete cycle in 200 pixels. Also the resultant value will be multiplied by 100. The reason of the multiplier is because otherwise the curve will have height of only 2 pixel in case of a sine wave. The curve will be drawn not from the top but from the middle of the canvas to take account the negetive values as well as positive values.
There are some minor tasks like disabling the buttons while one curve is drawn or clearing the equation after the curve is been drawn.
Here is the complete source code for it.
Please leave a comment if you have any doubt and also how to improve it. I am still inexperienced in programming field and have lots to know from you...
Thanks....
PS: BTW if you love music check out Madonna's new album Hard Candy. I am listening to the songs right now and they are excellent :)
Wednesday, September 3, 2008
Google Chrome - An Exciting Eeperience
Hi,

Lets talk about something not directly related to Silverlight.
Last night Google launched Chrome, its new open source browser. It is currently in beta. I have tried it and it seems exciting. Here is my "half day experience" about it.


Last night Google launched Chrome, its new open source browser. It is currently in beta. I have tried it and it seems exciting. Here is my "half day experience" about it.
Things I like
1.Clean Interface: It has the cleanest interface of all the browsers I have used. While viewing websites you really will see the content not the browser. It has one url bar and that is also used for searching.
2. Task manager: Control -> Developer -> task manager or shift + escape. It shows which tab is using most of your cpu and memory and you can easily end it. It has high details of the processing running in it . Stats for nerds.

3.Most Visited sites: It has opera style speed dial feature that stores most visited 9 sites in thumbnail format for easy accessing. It also keeps trak of recent changes and provide a means to search history.

4.Developer support: It has a powerful javascript console and debugging support for helping developers. It also has support for CSS and html like Firebug in FF.

5. Incognito browsing: ctrl+shift+N. It will help you prevent your privacy while not storing anything of what you do in that window. It is an easy way when we have to surf internet from internet cafe or other untrusted places.
6. Search history: We can search inside the history. ctrl + H.
7. Crash resistant: One tab is completely independent of others and crashing of one tab or taking longer time to load does not afect others. This is really exciting and I have not been successful to have it crash or misbehave.
8. Fast opening and closing time: In my experience it opens faster and close smoothly.
There are lots of other features that I like but above ones are the main ones I have seen now.
PS: It claims about being faster than other browsers that might be debatable. Though I can say it is not slower than those for sure.
Things I don't like
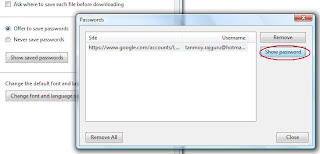
1. Password management: It will show your password if you go to settings -> options -> minor tasks -> show saved password then choose the web site and show password. I think it should be controled by a master password like FF does and also it should not be enabled default.

Acid test : I have make Acid 3 test in it and it got a score of 76. Failed ofcourse. But it is still a decent score as IE 7 scores 11 FF3 71 and Opera-9 80 in it.

And oh Yes Silverlight! I am using Windows Vista as my OS. I have seen my blog in this browser and I can see my silverlight application there. But they do not function properly. :(. In Silverlight.net site I can see Silverlight 2 applications but not the Silverlight 1 applications. Silverlight 2 applications are also not working properly. But that does not seem to be a problem on long go as both are beta right now and if Chrome gets popularity Microsoft will get it work there too.
I will continue using it and will hope it gets good popularity soon.
Download link www.google.com/chrome
Thursday, August 28, 2008
Skinning a Simple Slider
[ Updated for Silverlight 2 ]
Hi all,
In this post I will explain how we can make a customized slider from the default one. Silverlight makes customizing a control very easy. We will concentrate on the design part only and try to do total thing without looking to the xaml code.
Here is how it will look finally.

Upper one is the default one and the lower one is the customized one.
Silverlight separates a controls programmatic behavior to its look and feel. Changing one of them does not affect the other.
Now here we will modify the look and feel of it. In other words we will change the default Template" or "Skin" the slider.
We will try to modify it in expression blend because though theoretically it can be done from Visual Studio practically it is lot more easier in blend.
Now first we have to understand Silverlight slider control consists of different parts. First of all it has vertical and horizontal part. Here we are using Horizontal one and that is default. Each of them consists of same set of components. Here we will concentrate on horizontal one but same concept will be applied for vertical one also.
Now Make a project in blend named SliderSkinningExample. Now add one slider control to it and give it a width of 400. It will now look like the top one in the previous image. Now right click it in interaction window and click edit control parts then create a copy.

We can create and empty template too. But as a slider contains different parts it is easier to make a copy of the default one and have some changes in it.

Now name the template to MySliderSkin. Now we have two choices of placing the template either in the same document or in the App.xaml. If you define it in App.xaml (Application) it will be accessible from anywhere in your page whereas this document will only make it available to the current usercontrol. Here we will define it in document. I will explain why later.
Now you will see the parts of the slider like the following.

Now we can see there is a main root grid and two child grid inside it; HorizontalTemplate and VerticalTemplate. Each has two repeat buttons and one thumb and one background rectangle. (They also ve one HorizontalTrackRectangleDisabledOverlay, ThumbDisabledOverlay and
VerticalTrackRectangleDisabledOverlay rectangle but we will not consider them for now.)
The main theme for the slider looks somewhat like the following. (Considering only the horizontal part)

The blue part is the thumb that tells what the current position is. Green part is the background rectangle. Red part is the "HorizontalTrackLargeChangeDecreaseRepeatButton" and the orange part is the "HorizontalTrackLargeChangeIncreaseRepeatButton".
Here we will be considering only the horizontal one. Make the vertical template part's visibility collapsed.
Now we will have to skin 4 components of the slider to get what we want.
1. Background Rectangle: (TrackRectangle). Make its height 12, RadiusX and RadiusY to 5, StrokeThicknes 1. Now we will apply some gradient to its Fill.

We have 3 gradient stop. Left and right one to #FF3F3F47 and middle one to #FF202022. We will leave other properties of this rectangle unchanged.
2. HorizontalTrackLargeChangeDecreaseRepeatButton: We can not directly change it as it is a control. we have to again make a template for it. RightClick it and create a copy of the default template. You will see only a Grid inside it. Have two rectangles inside the root grid. (Make the root grid opacity to 100% as by default it is set to zero.
a) First rectangle: Set its width auto, height 10, stroke thickness 0. Make horizontal and vertical alignment to stretch. RadiusX and RadiusY to 4 (as this is slightly smaller than the background rectangle we are setting the RadiusX and RadiusY to 4 insteed of 5).
Fill this rectangle with the same style gradient, only make the gradient stop colors #FFEAC6C6 for left and right and #FFF7F7F7 for the middle. Set left margin 6.
b) Second rectangle: The purpose of this rectangle is to hide the rounded corner of the first rectangle to the right side. See the following two images to get the clear idea.

Without the second rectangle.

with second rectangle.
Copy the first rectangle. Make horizontal alignment of the second rectangle right and have a width of 10 and height of 10. Keep radiusx and radiusy 0. Set the right margin to -2. (You will not see it like the above image as we did not skin the thumb yet.)
3. HorizontalThumb: Make horizontal thumb height and width to auto. Create a copy of the template for HorizontalThumb. Delete everything inside it except the root grid. Have two ellipse inside it.
a) Outer ellipse: Height and width 18. Stroke thickness 2. Fill radial gradient. Left and right of gradient stop color #FF000000 middle gradient stop color #FFF0F0F4. Stroke color #FF555555.
a) Inner ellipse: Height and width 5. Stroke thickness 2. Fill #FFFFFFFF. Stroke color #FF727070. Horizontal and vertical alignment center.
4. HorizontalTrackLargeChangeIncreaseRepeatButton: No need to change.
Now the slider should look like the above one.
To apply this style to a new slider drag a new slider in the page and right click it and select edit control part -> apply resource -> MySliderSkin.

Unto now we never seen the xaml that is created for this. Frankly we don't have to. Just to know what blend has created for us lets see it in xaml view in blend or open it from Visual Studio.
Everything has been created inside UserControl.Resources tag. We can copy this to App.xaml also and only have to change to Application.Resources from UserControl.Resources. If you carefully see you will see there are something called VisualState and VisualStateGroup inside the xaml code. They are used for handling different states like mouse over, pressed , focused etc. They can be controlled from blend design view though we are not doing anything with them in this example.
Another thing: We did not created the style in Application level because if we create it we can not use blend for making templates for the inner controls of the slider like thumb. This problem is likely to be fixed in later versions of blend.
Please leave a comment if you have any doubt or if you found some error in this.
I am trying to build some simple Silverlight application at home and I will share them once finished. I am also thinking of changing the colors and modifying this blog a bit. Bye for now...
Tuesday, July 29, 2008
Some Lesser known things in Silverlight
[ Updated for Silverlight 2]
Here are some of them.......
1. EnableFrameRateCounter : Wander what fps (Frames per Second) is you silverlight application running? Set EnableFrameRateCounter="true" in your aspx page.
The default maximum value is 60
<asp:Silverlight ID="Xaml1" runat="server" Source="~/ClientBin/TicTacToe.xap" MinimumVersion="2.0.30523"
Width="100%" Height="100%">
<PluginNotInstalledTemplate>
Write something to show if plugin not installed
</PluginNotInstalledTemplate>
</asp:Silverlight>
<iframe style='visibility:hidden;height:0;width:0;border:0px'></iframe>
Here are some of them.......
1. EnableFrameRateCounter : Wander what fps (Frames per Second) is you silverlight application running? Set EnableFrameRateCounter="true" in your aspx page.
The default maximum value is 60
this is what is shows in my browser. 19.74 is actual and 60 is max set value.
You can set MaxFrameRate there in that tag too. The Actual fps will depend with processor speed and how busy it is.
2. EnableRedrawRegions: This is sometimes helpful when debugging. Setting it true will show when Silverlight redraws any region. Here I what I got when animating a circle.

<asp:Silverlight ID="Xaml1" runat="server" Source="~/ClientBin/TicTacToe.xap" MinimumVersion="2.0.30523"
Width="100%" Height="100%">
<PluginNotInstalledTemplate>
Write something to show if plugin not installed
</PluginNotInstalledTemplate>
</asp:Silverlight>
4. SplashScreen: Whenever we start a silverlight application the silverlight control provides a default splash screen while the xap file is loading. It is pretty good but still sometimes we need to add our own splash screen. Here is the Silverlight tutorial that shows it step by step.
Here is a blog post that will help providing splash screen with asp:Silverlight tag.
5. InitParameters: You can pass initialization variables with InitParameters. here is a sample
and now from App.Xaml.cs file
private void Application_Startup(object sender, StartupEventArgs e)
{
string baseUrl = e.InitParams["BaseUrl"];
string reasourceUrl = e.InitParams["ResourceUrl"];
this.RootVisual = new Page();
}
You can pass the parameters in the constructor of Page class.
6. Read Query Strings: Add System.Windows.Browser namespace where you want to access query string.
if(HtmlPage.Document.QueryString.Keys.Contains("Name"))
{
string name = HtmlPage.Document.QueryString["Name"];
}
Url- http://SampleDomain/SamplePage.aspx?Name=Tanmoy
7. Famous Firefox nested DIV problem: Strictly speaking this is not related to silverlight. Still you might have faced this problem with firefox. Try to run the following in FF.
<div>
<div style="height: 100%;">
<asp:Silverlight ID="Xaml1" runat="server" Source="~/ClientBin/TicTacToe.xap" MinimumVersion="2.0.30523"
Width="100%" Height="100%">
<PluginNotInstalledTemplate>
Write something to show if plugin not installed
</PluginNotInstalledTemplate>
</asp:Silverlight>
</div>
</div>
It will run in IE but not in FF. Remove the upper DIV and it will run properly. One work around is to set height=100% to the upper DIV. This problem is because FF deals DIV differently.
<iframe style='visibility:hidden;height:0;width:0;border:0px'></iframe>
The reason behind this iframe is stated in the documentation like the following
The presence of an IFrame prevents the Safari browser from caching the page. Safari caching prevents the Silverlight plug-in from reloading when the user navigates back to a previously-visited Silverlight page.
9. How to open .xap file: I guess you already know it but if you don't it is one coolest thing. XAP is a binary format but it is actually a .zip file renamed to .xap. So you can open it with WinZip or any other .zip file opener. It has one AppManifest.xaml file inside that defines the entry points and other assembly you are using. It also will have DLLs and optionally any resources you need to be loaded with the xap.
10. Relative positioning: It is possible to position the elements inside the Silverlight component relatively. For this you have to use Grid or StackPanel. I am showing it with a code.
<Grid x:Name="LayoutRoot" Background="Gray" ShowGridLines="True" HorizontalAlignment="Center" VerticalAlignment="Center" Width="300" Height="300">
<Grid.ColumnDefinitions>
<ColumnDefinition Width="*" />
<ColumnDefinition Width="2*"/>
<ColumnDefinition Width="3*"/>
<ColumnDefinition Width="*"/>
</Grid.ColumnDefinitions>
<Grid.RowDefinitions >
<RowDefinition Height="50" />
<RowDefinition Height="2*"/>
<RowDefinition Height="auto" />
<RowDefinition Height="*"/>
</Grid.RowDefinitions>
<Rectangle Grid.Column="2" Grid.Row="2" Height="40" Width="30" Fill="Blue" />
</Grid>
First the ShowGridLines="True". It is very useful when you are experimenting with Grids. It shows the outlines of your Grid with dotted lines.
Now here is the output I got

Now here is explanation.
Total width is 300 px and it is distributed with 4 columns in 1:2:3:1 ratio.
Now coming back to rows. There are 4 rows sharing 300px height. But one of them is occupying 50px. Now the height of the 3rd row is set to auto. That means it will take the height of its child element. That is the blue rectangle. Rest of the height available will be distributed with other two rows with 2:1 ratio.
I have been writing this post for quite a long time. Been busy with other tasks too. In anything you want to ask please leave a comment.
Friday, July 18, 2008
Why I Shifted My Blog
I have been using Wordpress.com for my blogs for quite a long time. I did not have any problem until recenly. Now as I am building a blog for Silverlight I first chosen Wordpress. The problem I faced was I can not display my application in my blog using javascript or even iframe. That was really annoying as I need at least iframe support. I searched their forum and it clearly been said iframe support is a distant dream. After continuing for some days I finally changed it to "old friend" blogger.com. Now I changed the design a bit. I am not a designer and this blog might not look very nice to you :).Still it is more flexible than that is in Wordpress and I will try to continue this here.
Thanks
Thanks
Mahjong! My favorite game
[ Updated for Silverlight 2]
Mahjong has been my favorite game since the days I started using Linux (SUSE 10.2). I just tried and made "Something" (Play it full screen. F11). So I can play my favorite game in my off time. Of course it was again with Silverlight. Now here is the explanation and logic used to make this game.
Page:
Page has 4 grids each with 15x9 dimension. So ultimately it gives the impression of a 3D stack. Each cell (total 15x9x4 cells) can be filled with a tile or left empty. The grids are been filled with tiles such a way it looks like a nice structure. In this structure 4th grid (I am calling as 4th rank) is empty. There are total 144 tiles. There are 12 types of tiles.
Tiles:
Each Tile is a user control. It has two canvases with rounded corner rectangles to make the nice 3D effect.
On the top canvas there are two rectangles. One for holding the tile image, another one to have mouse over effect.(Yellow one).
Each tile has 4 types of animations associated with it. (ClickAnimation, ClickOutAnimation, MouseOverAnimation, NotMatch). Click out animation will happen if user clicks the same tile twice. Not mach animation will happen when user tries to match wrong set of tiles.
Each tile has one TileNumber that determines the image to be put in the tile and it also helps in finding match.
Tile:
Each tile is having four variables associated with it.
TileNumber- Used to find match.
TilePosition- Gives rank, row and column in a 3 dimensional structure.
ParentPage- A reference to the Page class so it can call its methods.
IsClicked- Tells if the tile has already been clicked
Before starting any animation it will call its ParentPage method CheckIfFree to see if the tile is free.
On click of the tile after confirming it is free It will again call another parent page method TileClicked. This method will try to match this current tile with the previous tile clicked. If it matches It will destroy two tiles or it will show the NotMatch animation.
The constructor of this user control takes a random number from Page and set the tile image accordingly.
Main Page and logic:
In the Page there are 4 grids (4th one is empty in this tile structure I am now using).
First I am making the look of the board with a 3 dimensional array. Each element of that array represents empty or occupied state in boolean.
After making the grid structure I am adding tiles which are marked occupied.
In making the tiles for each tile GetTileNumber method returns one random number between 0 to 11 and it returns such a way that every number will be for 12 times making total 144 tiles.
This is the tile number used generally and I am also using for my game.
int[] TileTypeCount;
TileTypeCount = new int[12];
private int GetTileNumber()
{
int tileNo;
do
{
tileNo = rnd.Next(12);
} while (TileTypeCount[tileNo] >= 12);
TileTypeCount[tileNo]++;
return tileNo;
}
Mahjong has been my favorite game since the days I started using Linux (SUSE 10.2). I just tried and made "Something" (Play it full screen. F11). So I can play my favorite game in my off time. Of course it was again with Silverlight. Now here is the explanation and logic used to make this game.
Design
Page:
Page has 4 grids each with 15x9 dimension. So ultimately it gives the impression of a 3D stack. Each cell (total 15x9x4 cells) can be filled with a tile or left empty. The grids are been filled with tiles such a way it looks like a nice structure. In this structure 4th grid (I am calling as 4th rank) is empty. There are total 144 tiles. There are 12 types of tiles.
Tiles:
Each Tile is a user control. It has two canvases with rounded corner rectangles to make the nice 3D effect.
On the top canvas there are two rectangles. One for holding the tile image, another one to have mouse over effect.(Yellow one).
Each tile has 4 types of animations associated with it. (ClickAnimation, ClickOutAnimation, MouseOverAnimation, NotMatch). Click out animation will happen if user clicks the same tile twice. Not mach animation will happen when user tries to match wrong set of tiles.
Each tile has one TileNumber that determines the image to be put in the tile and it also helps in finding match.
Algorithm and code
Tile:
Each tile is having four variables associated with it.
TileNumber- Used to find match.
TilePosition- Gives rank, row and column in a 3 dimensional structure.
ParentPage- A reference to the Page class so it can call its methods.
IsClicked- Tells if the tile has already been clicked
Before starting any animation it will call its ParentPage method CheckIfFree to see if the tile is free.
On click of the tile after confirming it is free It will again call another parent page method TileClicked. This method will try to match this current tile with the previous tile clicked. If it matches It will destroy two tiles or it will show the NotMatch animation.
The constructor of this user control takes a random number from Page and set the tile image accordingly.
Main Page and logic:
In the Page there are 4 grids (4th one is empty in this tile structure I am now using).
First I am making the look of the board with a 3 dimensional array. Each element of that array represents empty or occupied state in boolean.
After making the grid structure I am adding tiles which are marked occupied.
In making the tiles for each tile GetTileNumber method returns one random number between 0 to 11 and it returns such a way that every number will be for 12 times making total 144 tiles.
This is the tile number used generally and I am also using for my game.
int[] TileTypeCount;
TileTypeCount = new int[12];
private int GetTileNumber()
{
int tileNo;
do
{
tileNo = rnd.Next(12);
} while (TileTypeCount[tileNo] >= 12);
TileTypeCount[tileNo]++;
return tileNo;
}
Filling tiles for the fast grid. Lowest level
// for set 1 rank 0
for (int row = MaxRow - 1; row >= 0; row--)
{
for (int col = 0; col < MaxCol; col++)
{
if (TileGridStructure[0, row, col]) continue;
TileStructure tile = new TileStructure(GetTileNumber(), this, new Position(0, row, col));
Grid.SetRow(tile, row);
Grid.SetColumn(tile, col);
Set1.Children.Add(tile);
TileCollection[0, row, col] = tile;
}
}
TileGridStructure tells if this place is to be filled with a tile or not.
Here you will find the complete source code.
Bye for now. Please leave a comment if you have any doubt or correction.
Here you will find the complete source code.
Bye for now. Please leave a comment if you have any doubt or correction.
Experimenting with DeepZoom
A new feature in silverlight is DeepZoom. Its extreamly popular in the Silverlight community and looks kool. I never touched it before. Today I installed DeepZoom Composer and started building "Something". It was easier than I thought. I used 50 images (Hi-resolution upto 7432 X 4168 ). All collected from wikipedia featured pictures to avoid licencing issues. I shaped it over like a G. It goes well. But I was trying to make something like DeepZoomObama. Last I saw the blog that describes Making of DeepZoomObama project. All that is need to make a mosaic with lots of images. I collected more (more than 350) Images from wikipedia and started building it. It took only around 2 to 3 hours to build this.
The software that used for this is andreamosaic and Silverlight Deep Zoom composer. Two softwares are extremely easy to use.
The software that used for this is andreamosaic and Silverlight Deep Zoom composer. Two softwares are extremely easy to use.
Eight Queen Code
[Updated for Silverlight 2]
I blogged previously about the N-Queen problem. Here I am going to explain how I did it.
The Board and the Queen
Canvas c = new Canvas();
if ((row + col) % 2 == 0)
{
c.Background = (LinearGradientBrush)Resources["BlackBrush"];
}
else
{
c.Background = (LinearGradientBrush)Resources["WhiteBrush"];
}
Also having a blue hidden rectangle in each square that shows up when that square is being traversed and creates a nice animation. Also having a global variable for storing the squares and blue rectangles as we need them later.
For adding and removing the Queen I am using this code.
Sqare[row, col].Children.Add(new Queen());
Sqare[row, col].Children.RemoveAt(0);
The Animation
The animation for the blue rectangle is like the following.
<Storyboard x:Name="AnimSquare" Storyboard.TargetProperty="Opacity" Duration="0:0:0.2">
<DoubleAnimationUsingKeyFrames BeginTime="00:00:00">
<SplineDoubleKeyFrame KeyTime="00:00:00" Value="0"/>
<SplineDoubleKeyFrame KeyTime="00:00:00.1" Value="1"/>
<SplineDoubleKeyFrame KeyTime="00:00:00.13" Value="0"/>
</DoubleAnimationUsingKeyFrames>
</Storyboard>
See there is no target name defined for the storyboard as we will be applying different square (The blue rectangle over the square exactly) as target.
AnimSquare.Stop();
Storyboard.SetTarget(AnimSquare, SquareMask[Grow, Gcol]);
AnimSquare.Begin();
The Algorithm
The algorithm is as follows.
As there will be 8 Queens for 8 rows there will be one at each row.
Start from the left top square.
Put a Queen if that does not captured by other queens.
Jump to the next row and try it for 8 squares in that row.
If unsuccessful then go to previous row and remove the previous Queen placed there and try another square that have not been tried for that row.
If that also unsuccessful go to lower rows until you find a new square to put the queen in that row.
This can be achieved with a recursion.
private void PlaceQueen(int row, int col)
{
if (row == NoOFQueen) return; //Get out of recursion
CheckedCol[row] = col;
if (IsSafe(row, col))
{
if (!flag)
{
PutQueen(row, col);
row++;
col = 0;
}
else
{
CheckedCol[row] = 0;
row--;
RemoveQueen(row, CheckedCol[row]);
col = CheckedCol[row] + 1;
}
}
else
{
if (col == (NoOFQueen - 1)) // No where to place queen in the row
{
CheckedCol[row] = 0;
row--;
RemoveQueen(row, CheckedCol[row]);
}
else
{
col++;
}
}
//Grow = row; Gcol = col;
PlaceQueen(row, col);
}
Now the methods used here are self explanatory and simple. There is only one tricky part in this recursion. That is the boolean flag. It keeps the track if the queen from the last column has been removed. So next there wont be any queen placed on that column even if the square is safe. It will go farther one level down and so. The flag is set false whenever a new queen is placed on the board.
There I did a little change in this method. Instead of calling the same method from PlaceQueen it has been called from a Tick event of a timer to enable animation. (see the commented Grow and Gcol. G for global ).
This version of my program is still yet needs optimization and some code cleanup. It does not check if something unexpected happens. It doesnt even have a safecounter for getting out of recursion in case 8 Queens can not be placed at all.
Here is the demo.
And you can download the complete source from here.
for any clarification or modification please leave a comment.
I blogged previously about the N-Queen problem. Here I am going to explain how I did it.
The Board and the Queen
I used a StackPanel to hold the Board and the button. The board is a 8x 8 Grid. And empty at design time. Also have a event handler for the button Click.
The Queen is a user control having just a Image with a white Background.
Now adding one Canvas for each square and painting it with blackish or whitish gradient brush already created as a resource
Repeating this for 64 squares.
The Queen is a user control having just a Image with a white Background.
Now adding one Canvas for each square and painting it with blackish or whitish gradient brush already created as a resource
Repeating this for 64 squares.
Canvas c = new Canvas();
if ((row + col) % 2 == 0)
{
c.Background = (LinearGradientBrush)Resources["BlackBrush"];
}
else
{
c.Background = (LinearGradientBrush)Resources["WhiteBrush"];
}
Also having a blue hidden rectangle in each square that shows up when that square is being traversed and creates a nice animation. Also having a global variable for storing the squares and blue rectangles as we need them later.
For adding and removing the Queen I am using this code.
Sqare[row, col].Children.Add(new Queen());
Sqare[row, col].Children.RemoveAt(0);
The Animation
The animation for the blue rectangle is like the following.
<Storyboard x:Name="AnimSquare" Storyboard.TargetProperty="Opacity" Duration="0:0:0.2">
<DoubleAnimationUsingKeyFrames BeginTime="00:00:00">
<SplineDoubleKeyFrame KeyTime="00:00:00" Value="0"/>
<SplineDoubleKeyFrame KeyTime="00:00:00.1" Value="1"/>
<SplineDoubleKeyFrame KeyTime="00:00:00.13" Value="0"/>
</DoubleAnimationUsingKeyFrames>
</Storyboard>
See there is no target name defined for the storyboard as we will be applying different square (The blue rectangle over the square exactly) as target.
AnimSquare.Stop();
Storyboard.SetTarget(AnimSquare, SquareMask[Grow, Gcol]);
AnimSquare.Begin();
The Algorithm
The algorithm is as follows.
As there will be 8 Queens for 8 rows there will be one at each row.
Start from the left top square.
Put a Queen if that does not captured by other queens.
Jump to the next row and try it for 8 squares in that row.
If unsuccessful then go to previous row and remove the previous Queen placed there and try another square that have not been tried for that row.
If that also unsuccessful go to lower rows until you find a new square to put the queen in that row.
This can be achieved with a recursion.
private void PlaceQueen(int row, int col)
{
if (row == NoOFQueen) return; //Get out of recursion
CheckedCol[row] = col;
if (IsSafe(row, col))
{
if (!flag)
{
PutQueen(row, col);
row++;
col = 0;
}
else
{
CheckedCol[row] = 0;
row--;
RemoveQueen(row, CheckedCol[row]);
col = CheckedCol[row] + 1;
}
}
else
{
if (col == (NoOFQueen - 1)) // No where to place queen in the row
{
CheckedCol[row] = 0;
row--;
RemoveQueen(row, CheckedCol[row]);
}
else
{
col++;
}
}
//Grow = row; Gcol = col;
PlaceQueen(row, col);
}
Now the methods used here are self explanatory and simple. There is only one tricky part in this recursion. That is the boolean flag. It keeps the track if the queen from the last column has been removed. So next there wont be any queen placed on that column even if the square is safe. It will go farther one level down and so. The flag is set false whenever a new queen is placed on the board.
There I did a little change in this method. Instead of calling the same method from PlaceQueen it has been called from a Tick event of a timer to enable animation. (see the commented Grow and Gcol. G for global ).
This version of my program is still yet needs optimization and some code cleanup. It does not check if something unexpected happens. It doesnt even have a safecounter for getting out of recursion in case 8 Queens can not be placed at all.
Here is the demo.
And you can download the complete source from here.
for any clarification or modification please leave a comment.
N-Queen Problem using Backtrack Recursion
[ Updated for Silverlight 2 ]
Hi,
For last two days I am trying to build a Silverlight Program that will solve n-queen (here I am using 8 ) problem and show it step by step to the user. After messing up with the logic finally managed to get it work. The algorithm still needs some improvements. I have uploaded the application in live streaming .
Those don't know about the 8-Queen Puzzle it is to place 8 queens in a chess board so no queen can capture others.
Here is the complete code for it. I will look up the code and clean it. I will explain it in my next post. For now I am listening to Celine Dion. There are lots of things happening today to make me happy :)
Beta 1 is dead
[ Beta 2 is dead too. This post is invalid after Silverlight 2 released ]
As we see with the linux development community there are some who like beta versions (me one of them). In Fedora download site I got it saying "Did someone say... beta?"
The main thing is there are some unknown or unintentional features (Bugs?!) that we use in betas to get our programs work. These hacks work great until the feature has been changed or removed :(. In the Code complete Steve Mcconnell warns us not to use them.
Anyway the code we have been building in Silverlight 2 beta 1 refused to work in beta 2. After some search and try error it did run but some parts needed complete rewrite.
Still I say its better to modify your application for beta 2 in case you did not do it yet. Here is why......
1. The user who is about to see it is more likely having latest plugin that is beta 2 and your beta 1 will refuse to work.
2. With time goes there will not be much help available for beta 1. Forum people will say UPGRADE.
3. There has been lots of modification from beta 1 to beta 2 but it is expected not to change much from beta 2 to final version.
So how to upgrade........
1. Uninstall your previous Silverlight stuffs. VS 2008 tool, Blend, everything.
2. Install new versions of those tools Silverlight tools beta 2. Expression Blend 2.5 June Preview.
3. Open your Visual Studio solution file. It will ask you to upgrade with beta 2.
4. Build your program. I will come to this point later.
5. After successfully build check the test aspx and html page of the website. There change type="application/x-silverlight-2-b2" in html and in aspx replace version attribute with MinimumVersion="2.0.30523". Also in the install silverlight link will be changed from http://go2.microsoft.com/fwlink/?LinkId=108182 to http://go2.microsoft.com/fwlink/?LinkID=115261.
What if my build failed...........
There are huge modifications from beta 1 to beta 2. So your old application might need to modify.
1. See the change list from here.
2. In my case the problem was with WebClient class. Because WebClient has been moved to System.Net.dll.
3. Another problem you might face is with event bubbling. Jesse Liberty has a great post explaning it. Basically you wont be able to catch mouse or keyboard events for controls because they themselves handle it. It has been done to maintain similarity between WPF and Silverlight. There are some workarounds if you really want to handle those events yourself. First Modify the template of your control or build a custom control deriving from the control you want to modify.
What if all of them don't work for me.........
Forums :)
My Experience with Silverlight
I have started my programming life with Silverlight. So it might be that I see it from a different view than some others already been in animation and programming.
I am not a writer and so I better stop now. I will try to keep on posting here some tips and tricks and workarounds that might help you save the time I have wasted to learn them.
The thrill that has been with it was its limited spread at that time. So there were hardly any people whom you can ask for help. The online rapid growing comunity has been a great comfort and still is. Some people really did excellent things that keep on impressing me.
The first task was a presentation kind of thing to be done with Silverlight 1.0. The animations and design are done by Pallavi and I know only little about designing.
The first task was a presentation kind of thing to be done with Silverlight 1.0. The animations and design are done by Pallavi and I know only little about designing.
As I am going through it and trying to explore more of it there are so many things to learn. After a bit break with Silverlight after 1.0 I am now back and working with Silverlight.
I am not a writer and so I better stop now. I will try to keep on posting here some tips and tricks and workarounds that might help you save the time I have wasted to learn them.
Thanks all for visiting my blog. I will try to keep it alive.
Subscribe to:
Comments (Atom)